SurfaceShaderやImageEffectを改造してお手軽トゥーン表現

このコンテンツは、『ユニティちゃんライセンス』で提供されています
この記事は Unity 2 Advent Calendar 2015 - Qiita の13日目の記事です。
12日目はtnayukiさんの「知る人ぞ知るUnity 5のネイティブオーディオプラグインについて - Qiita」でした。
●はじめに
ここ最近、UnityやUE4を使ったトゥーンレンダリングが流行っているようです。(今月のCGWORLDもトゥーンの話多いですし)
Unityシェーダ入門というタイトルのブログを書いていて、何もしないわけにはいきません。
ということで、SDユニティちゃんをモデルとしてトゥーン表現を考えていきます。
結構長いです。
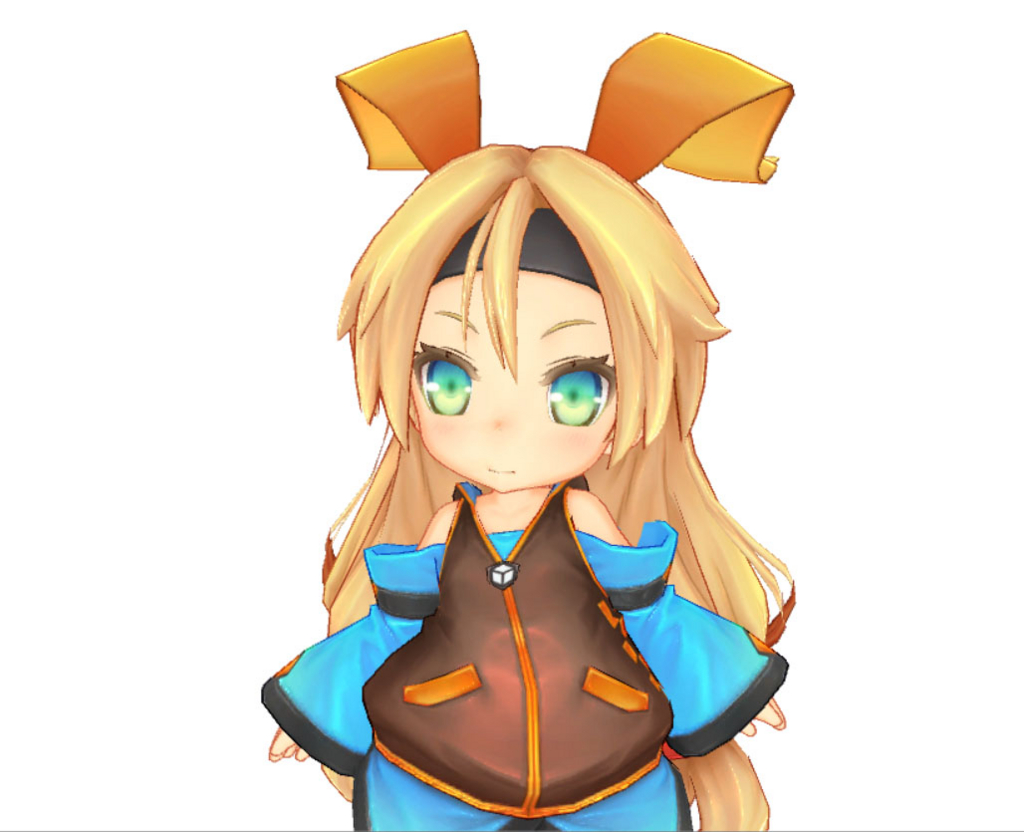
●エッジ検出(EdgeDetection_0)
エッジとは、アニメやイラストで言うところの線画のことです。
もともと現実世界には存在しないもので、人間が絵を描く際に便宜的に用いられるものです。
エッジ(境界=>正確には縁でした)という名の通り境界部分に発生しますが、何の境界に発生するのか、人間が描く場合と併せて考えてみましょう。
基本的には以下の三要素です。
| バッファ | 人間が描く場合 |
|---|---|
| カラー | 髪や肌の境界、肌や服の境界など、素材を区別したい場合 |
| 深度 | 同一素材(顔の上に手を重ねるなど)で、前後関係を区別したい場合 |
| 法線 | 鼻や鎖骨など、滑らかな凹凸を強調したい場合 |
●標準のイメージエフェクトを観察する(EdgeDetection_1)
それでは、ユニティちゃんシェーダと、Unityに標準で入っているEdgeDetection(イメージエフェクト)を見てみましょう。
IEと入っているものがイメージエフェクトを使用したものです。
| 手法 | 結果 | 備考 |
|---|---|---|
| Standardシェーダ |  |
StandardShaderに変更したものです。リアルですがちょっと怖いです。 |
| ユニティちゃんシェーダ | 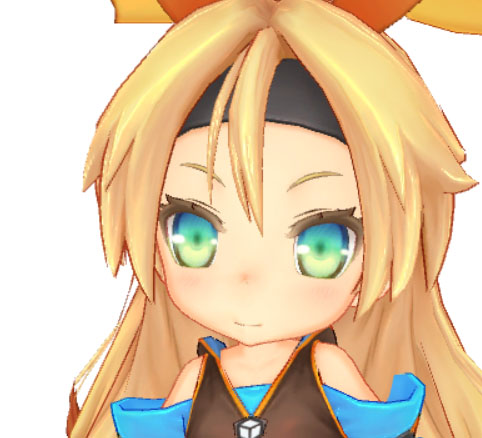 |
デフォルト。ImageEffectは使用していませんが、ユニティちゃんシェーダ自体が2パスで輪郭線を出しています。可愛い |
| IE:TriangleLuminance | 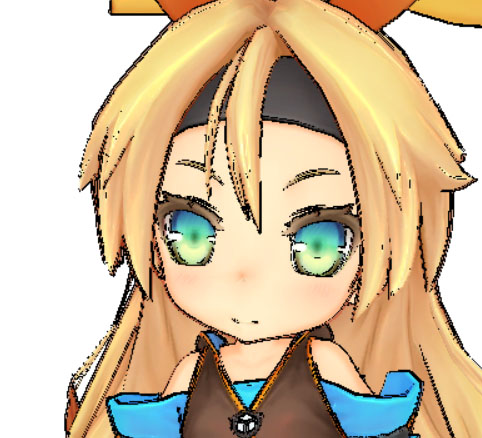 |
色の差によるラインです。テクスチャに入ってる陰影の差にもラインが発生しているため汚い感じになっています。テクスチャの単色化が必要です。 |
| IE:SobelDepthThin |  |
背景とキャラの輪郭線が取れています |
| IE:SobelDepth | 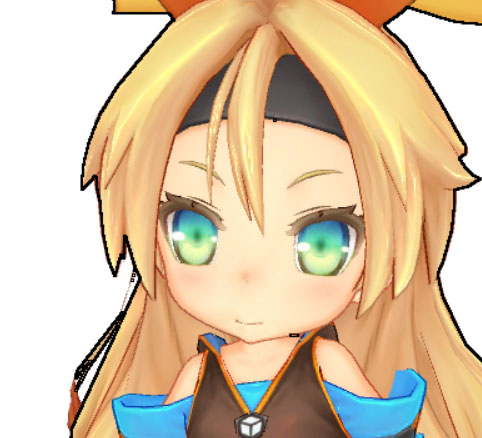 |
上記の線が太くなったバージョン |
| IE:RobertsCrossDepthNormals | 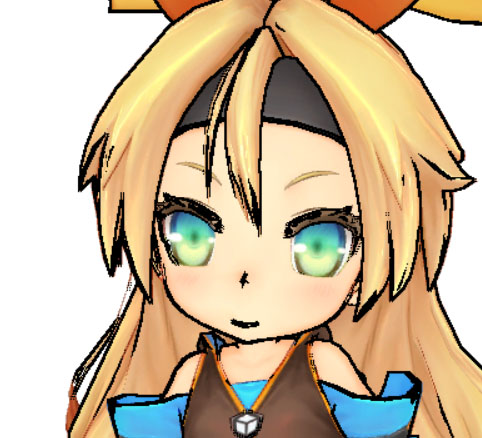 |
深度による線に加え、法線によって鼻やその他細部の線が出ています |
| IE:TriangleDepthNormals | 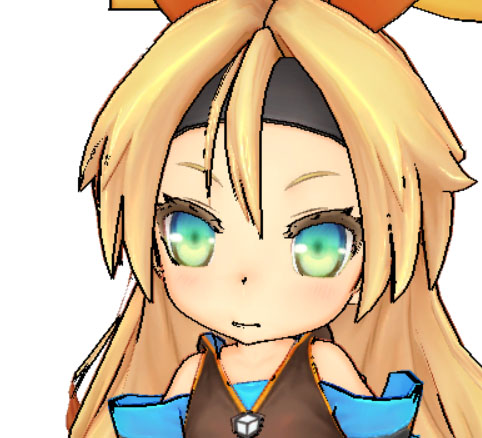 |
こちらも深度と法線のため、上と傾向は似ています |
●エッジ出力の種類(EdgeDetection_2)
上記のように、線画を出す手法はシェーダとイメージエフェクトの2種類あります。
(どちらもシェーダには変わりありませんが……イメージエフェクトのほうは全体魔法とでも考えてください)
■シェーダによる線画出力
1パス目は法線方向にモデルを膨らませて大きめにシルエットを描画し、2パス目で通常のレンダリングをします。
通常のレンダリングで覆いきれなかったシルエット部分が線画に見えるという手法です。
利点は線の太さをモデル側で調整しやすい(頂点カラーなどで)ことで、
欠点は2パスレンダリングが必要なことと、基本的には深度差による境界線しか出せないことです。
(この場合、テクスチャに線を入れます。http://www.4gamer.net/games/216/G021678/20140703095/など参照)
■イメージエフェクトによる線画検出
後処理の段階で、線画を付与します。
入力データとしてはカラー、深度、法線のラスタ情報になります。
利点は、上記の情報さえ揃っていれば画面全体に適用できるため、モデル調整の(人的)コストや描画コストが低いこと。
欠点は細かい調整が難しいところです。
今回はモデルにあまり手を入れないお手軽な手法ということで、イメージエフェクトベースのエッジ検出シェーダを作ります。
(プロが作ったモデルに素人が手を入れても、まずろくな事になりませんから……)
●基本のイメージエフェクト(EdgeDetection_3)
今回は標準のイメージエフェクトと差別化するため、カラー、深度、法線すべての要素を使ったエッジ検出イメージエフェクトを作ろうと思います。また標準のイメージエフェクトでは検出した線をそのまま出してしまい調整が利かないので、線画だけ一時バッファに出力し、最後にコンポジットする形をとります。
以下ソースコードです。
レンダリングパスの設定はDeferredにしておきます。
SengaEffect.cs
using UnityEngine;
using System.Collections;
using UnityStandardAssets.ImageEffects; // Unity5からImageEffectBaseを用いるのに必要

[ExecuteInEditMode]
public class SengaEffect : ImageEffectBase  // ImageEffectBaseを継承
{
    public float SampleDistance = 1;
    public float NormalThreshold = 0.1f;
    public float DepthThreshold = 5;
    public float ColorThreshold = 1f;

    // エフェクト有効時に、深度と法線バッファを有効にする
    void OnEnable()
    {
        GetComponent<Camera>().depthTextureMode |= DepthTextureMode.DepthNormals;
    }


    void OnRenderImage(RenderTexture source, RenderTexture destination)
    {
        // 一時バッファ確保
        var senga = RenderTexture.GetTemporary(source.width, source.height, 0, RenderTextureFormat.ARGB32);


        // エッジ検出パス(0)
        material.SetFloat("_SampleDistance", SampleDistance);
        material.SetVector("_Threshold", new Vector4(NormalThreshold, DepthThreshold, ColorThreshold, 0));
        Graphics.Blit(source, senga, material, 0);

        // コンポジットパス(1)
        material.SetTexture("_MainTex", source); // 明示的に渡さないとなぜかグレーになる
        material.SetTexture("_SengaTex", senga);
        Graphics.Blit(source, destination, material, 1);


        // 一時バッファの解放
        RenderTexture.ReleaseTemporary(senga);
    }
}
SengaEffect.shader
Shader "Hidden/SengaEffect"
{
	SubShader
	{
		// No culling or depth
		Cull Off ZWrite Off ZTest Always

		// エッジ検出(pass0)
		Pass
		{
			CGPROGRAM
			#pragma vertex vert
			#pragma fragment frag
			#pragma target 5.0

			#include "UnityCG.cginc"

			struct appdata
			{
				float4 vertex : POSITION;
				float2 uv : TEXCOORD0;
			};

			struct v2f
			{
				float4 vertex : SV_POSITION;
				float2 uv : TEXCOORD0;
				float2 uv2[2] : TEXCOORD1;	// 追加のUV座標
			};

			sampler2D _MainTex;
			uniform float4 _MainTex_TexelSize;
			sampler2D _CameraDepthNormalsTexture;

			half _SampleDistance;
			half4 _Threshold;

			v2f vert(appdata_img v)
			{
				v2f o;
				o.vertex = mul(UNITY_MATRIX_MVP, v.vertex);

				float2 uv = MultiplyUV(UNITY_MATRIX_TEXTURE0, v.texcoord);
				o.uv = uv;

				// uv2[0]は1ピクセル右
				// uv2[1]は1ピクセル上
				o.uv2[0] = uv + float2(_MainTex_TexelSize.x, 0) * _SampleDistance;
				o.uv2[1] = uv + float2(0, -_MainTex_TexelSize.y) * _SampleDistance;

				return o;
			}


			fixed4 frag (v2f i) : SV_Target
			{
				fixed4 centercolor = tex2D(_MainTex, i.uv);
				half4 depthnormal = tex2D(_CameraDepthNormalsTexture, i.uv);
				half centerDepth = DecodeFloatRG(depthnormal.zw);
				half2 centerNormal = depthnormal.xy;
				half4 edge = 0;

				for (int j = 0; j < 2; j++)
				{
					half2 uv = i.uv2[j];
					half4 color = tex2D(_MainTex, uv);
					half4 dn = tex2D(_CameraDepthNormalsTexture, uv);

					// 法線によるエッジ
					half2 ndiff = abs(centerNormal - dn.xy);
					if ((ndiff.x + ndiff.y) > _Threshold.x)
					{
						edge.a = 1;
					}

					// 深度によるエッジ
					half ddiff = abs(centerDepth - DecodeFloatRG(dn.zw));
					if (ddiff * _Threshold.y > 0.09 * centerDepth)
					{
						edge.a = 1;
					}

					// 色によるエッジ
					half3 diff = centercolor.rgb - color.rgb;
					if (dot(diff, diff) > _Threshold.z)
					{
						edge.a = 1;
					}
				}
				return edge;
			}
			ENDCG
		}


		Pass // コンポジット(pass1)
		{
			CGPROGRAM
			#pragma vertex vert
			#pragma fragment frag
			#pragma target 5.0

			#include "UnityCG.cginc"

			struct v2f
			{
				float4 vertex : SV_POSITION;
				float2 uv : TEXCOORD0;
			};

			sampler2D _MainTex;
			sampler2D _SengaTex;

			v2f vert(appdata_img v)
			{
				v2f o;
				o.vertex = mul(UNITY_MATRIX_MVP, v.vertex);

				float2 uv = MultiplyUV(UNITY_MATRIX_TEXTURE0, v.texcoord);
				o.uv = uv;

				return o;
			}


			fixed4 frag(v2f i) : SV_Target
			{
				fixed4 color = tex2D(_MainTex, i.uv);
				fixed4 edge = tex2D(_SengaTex, i.uv);

				return color *(1 - edge.a);
			}
			ENDCG
		}
	}
}
深度、法線、カラーそれぞれでエッジを生成し、コンポジットパスで合成(乗算)します。
まずはこのシェーダを基本としてカスタマイズしていきます。

●テクスチャとSurfaceShaderを弄る
まずアニメと同じように単色から始めたいので、修正していきます。
テクスチャから陰影を取り除く
まずテクスチャに陰影が載っているために、色の差によるエッジを出すことが出来ません。
直接テクスチャを弄って陰影を取り除きます。
(再頒布になりそうなのでテクスチャは載せません)
SurfaceShaderを改造
ユニティちゃんシェーダでは色々と複雑なことをしているため、もっと単純な、そしてDeferredシェーディングに適合するシェーダーに置き換えます。また輪郭が丸くなるように、ついでにテッセレーションも使いましょう。
Shader "NPR/FlatShaderTES" {
	Properties {
		_Color ("Color", Color) = (1,1,1,1)
		_MainTex ("Albedo (RGB)", 2D) = "white" {}

		_EdgeLength("Edge length", Range(3,50)) = 10
		_Smoothness("Smoothness", Range(0,1)) = 0.5
	}
	SubShader {
		Tags { "RenderType"="Opaque" }
		Cull Off
		LOD 200

		CGPROGRAM
		// Physically based Standard lighting model, and enable shadows on all light types
		#pragma surface surf StandardSpecular vertex:disp  tessellate:tessEdge tessphong:_Smoothness
		#include "Tessellation.cginc"

		// Use shader model 3.0 target, to get nicer looking lighting
		#pragma target 5.0

		sampler2D _MainTex;
		sampler2D _MaskTex;
		float _EdgeLength;
		float _Smoothness;

		half _Glossiness;
		half _Metallic;
		fixed4 _Color;


		struct appdata {
			float4 vertex : POSITION;
			float4 tangent : TANGENT;
			float3 normal : NORMAL;
			float2 texcoord : TEXCOORD0;
			float2 texcoord1 : TEXCOORD1;
			float2 texcoord2 : TEXCOORD2;
		};

		float4 tessEdge(appdata v0, appdata v1, appdata v2)
		{
			return UnityEdgeLengthBasedTessCull(v0.vertex, v1.vertex, v2.vertex, _EdgeLength, 0.0);
		}

		void disp(inout appdata v)
		{
			// do nothing
		}

		struct Input {
			float2 uv_MainTex;
			float3 worldNormal;
			float3 worldPos;
		};

		void surf (Input IN, inout SurfaceOutputStandardSpecular o)
		{
			fixed4 c = tex2D (_MainTex, IN.uv_MainTex) * _Color;
			o.Albedo = c.rgb;

			o.Emission = 0;
			o.Specular = 0;
			o.Smoothness = 0;
			o.Alpha = 0;
		}
		ENDCG
	}
	FallBack "Diffuse"
}
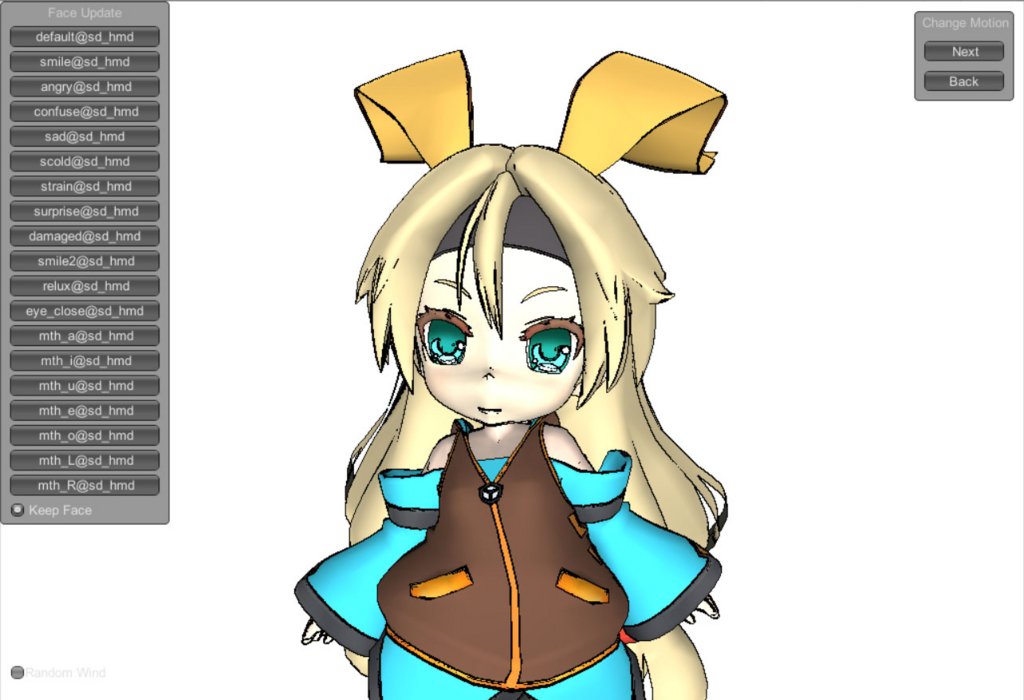
●シェーディング結果を消す
ここらでDeferredシェーディングによる陰影が邪魔になってきたので、取り除きます。
Deferredシェーディングの場合、Gバッファ(アルベド、スペキュラ+スムースネス、法線、発光+ライティング結果)がイメージエフェクトから取り出せます。
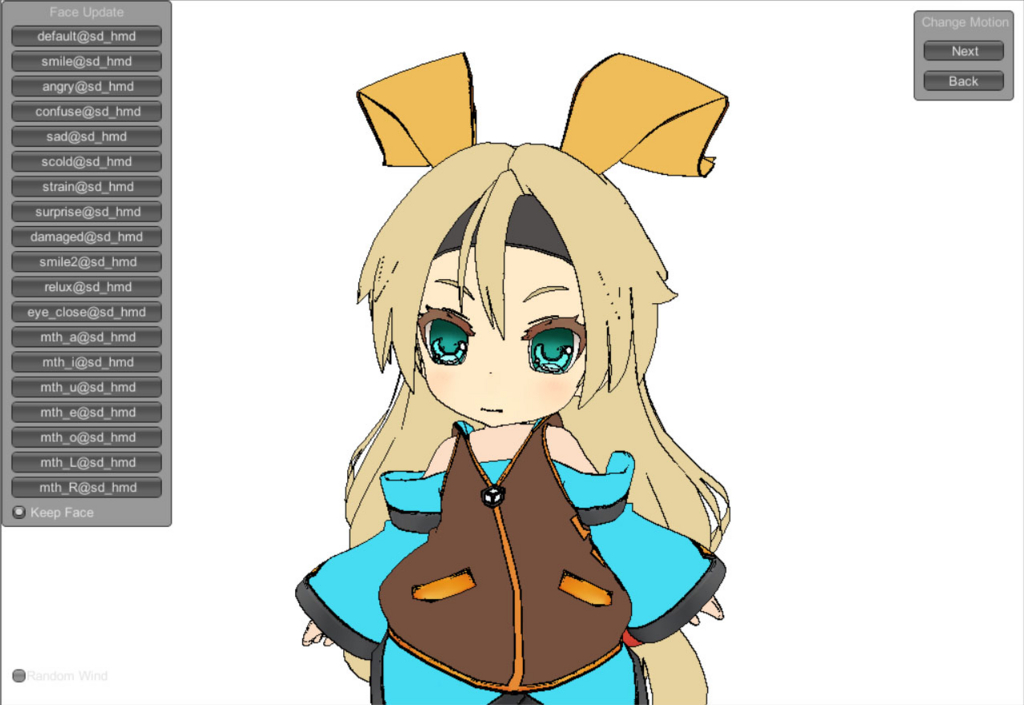
シェーディングされた結果のsourceの代わりに、Gバッファのアルベドを直接出力して、テクスチャそのものの値を出力します。
SengaEffect2.cs
    void OnRenderImage(RenderTexture source, RenderTexture destination)
    {
        // 一時バッファ確保
        var senga = RenderTexture.GetTemporary(source.width, source.height, 0, RenderTextureFormat.ARGB32);
        var albedo = RenderTexture.GetTemporary(source.width, source.height, 0, RenderTextureFormat.ARGB32);

        // カラー出力パス(2)
        Graphics.Blit(source, albedo, material, 2);

        // エッジ検出パス(0)
        material.SetTexture("_ColorTex", albedo);
        material.SetTexture("_MainTex", source);
        material.SetFloat("_SampleDistance", SampleDistance);
        material.SetVector("_Threshold", new Vector4(NormalThreshold, DepthThreshold, ColorThreshold, 0));
        Graphics.Blit(source, senga, material, 0);

        // コンポジットパス(1)
        material.SetTexture("_SengaTex", senga);
        Graphics.Blit(source, destination, material, 1);


        // 一時バッファの解放
        RenderTexture.ReleaseTemporary(senga);
        RenderTexture.ReleaseTemporary(albedo);
    }
カラー出力パスでテクスチャの色を出力し、それをエッジ検出パスとコンポジットパスで_ColorTexとして用います。
SengaShader2.shader
Shader "Hidden/SengaEffect2"
{
	SubShader
	{
		// No culling or depth
		Cull Off ZWrite Off ZTest Always

		// エッジ検出(pass0)
		Pass
		{
			CGPROGRAM
			#pragma vertex vert
			#pragma fragment frag
			#pragma target 5.0

			#include "UnityCG.cginc"

			struct appdata
			{
				float4 vertex : POSITION;
				float2 uv : TEXCOORD0;
			};

			struct v2f
			{
				float4 vertex : SV_POSITION;
				float2 uv : TEXCOORD0;
				float2 uv2[2] : TEXCOORD1;	// 追加のUV座標
			};

			sampler2D _MainTex;
			uniform float4 _MainTex_TexelSize;
			sampler2D _ColorTex;
			sampler2D _CameraDepthNormalsTexture;

			half _SampleDistance;
			half4 _Threshold;

			v2f vert(appdata_img v)
			{
				v2f o;
				o.vertex = mul(UNITY_MATRIX_MVP, v.vertex);

				float2 uv = MultiplyUV(UNITY_MATRIX_TEXTURE0, v.texcoord);
				o.uv = uv;

				// uv2[0]は1ピクセル右
				// uv2[1]は1ピクセル上
				o.uv2[0] = uv + float2(_MainTex_TexelSize.x, 0) * _SampleDistance;
				o.uv2[1] = uv + float2(0, -_MainTex_TexelSize.y) * _SampleDistance;

				return o;
			}


			fixed4 frag (v2f i) : SV_Target
			{
				fixed4 centercolor = tex2D(_ColorTex, i.uv);
				half4 depthnormal = tex2D(_CameraDepthNormalsTexture, i.uv);
				half centerDepth = DecodeFloatRG(depthnormal.zw);
				half2 centerNormal = depthnormal.xy;
				half4 edge = 0;

				for (int j = 0; j < 2; j++)
				{
					half2 uv = i.uv2[j];
					half4 color = tex2D(_ColorTex, uv);
					half4 dn = tex2D(_CameraDepthNormalsTexture, uv);

					// 法線によるエッジ
					half2 ndiff = abs(centerNormal - dn.xy);
					if ((ndiff.x + ndiff.y) > _Threshold.x)
					{
						edge.a = 1;
					}

					// 深度によるエッジ
					half ddiff = abs(centerDepth - DecodeFloatRG(dn.zw));
					if (ddiff * _Threshold.y > 0.09 * centerDepth)
					{
						edge.a = 1;
					}

					// 色によるエッジ
					half3 diff = centercolor.rgb - color.rgb;
					if (dot(diff, diff) > _Threshold.z)
					{
						edge.a = 1;
					}
				}
				return edge;
			}
			ENDCG
		}


		Pass // コンポジット(pass1)
		{
			CGPROGRAM
			#pragma vertex vert
			#pragma fragment frag
			#pragma target 5.0

			#include "UnityCG.cginc"

			struct v2f
			{
				float4 vertex : SV_POSITION;
				float2 uv : TEXCOORD0;
			};

			sampler2D _ColorTex;
			sampler2D _SengaTex;

			v2f vert(appdata_img v)
			{
				v2f o;
				o.vertex = mul(UNITY_MATRIX_MVP, v.vertex);

				float2 uv = MultiplyUV(UNITY_MATRIX_TEXTURE0, v.texcoord);
				o.uv = uv;

				return o;
			}


			fixed4 frag(v2f i) : SV_Target
			{
				fixed4 color = tex2D(_ColorTex, i.uv);
				fixed4 edge = tex2D(_SengaTex, i.uv);

				return color *(1 - edge.a);
			}
			ENDCG
		}

		Pass // カラー出力(pass2)
		{
			CGPROGRAM
			#pragma vertex vert
			#pragma fragment frag
			#pragma target 5.0

			#include "UnityCG.cginc"

			struct v2f
			{
				float4 vertex : SV_POSITION;
				float2 uv : TEXCOORD0;
			};

			sampler2D _CameraGBufferTexture0;

			v2f vert(appdata_img v)
			{
				v2f o;
				o.vertex = mul(UNITY_MATRIX_MVP, v.vertex);

				float2 uv = MultiplyUV(UNITY_MATRIX_TEXTURE0, v.texcoord);
				o.uv = uv;

				return o;
			}


			fixed4 frag(v2f i) : SV_Target
			{
				fixed4 color = tex2D(_CameraGBufferTexture0, i.uv);
				return color;
			}
			ENDCG
		}
	}
}
●線画の魅力を高める(EdgeDetection_4)
イラストを描かれる方は分かると思いますが、線画はただの境界線ではありません。
ただ単に正確な境界線が出れば良いというわけではないのが、トゥーンレンダリングにおけるエッジ検出の難しいところです。
よく使われる線画テクニックは以下の4つでしょう。
- 線の太さを変えて強弱を出す
- 他の線とぶつかる場所を塗りつぶす
- 線の色を変える
- 勝手にはみ出る線
これらをイメージエフェクトに追加していきましょう。
●線の濃さと太さ(EdgeDetection_5)
イラストを描く場合、普通は最終的に見せる時の解像度よりも高くして描きます。
それによって粗が見えにくくなったり、縮小することで自動的にアンチエイリアスが掛かるからです。
さてこの場合、1pxで描いた線画を半分に縮小するとどうなるでしょうか。
ディスプレイに0.5pxが存在するわけもなく、単に周囲の色と混ざって線の濃さが薄くなります。
1pxの線なら100%の黒、0.5px相当の線なら50%の黒、という風になるわけです。
結局何を言いたいかというと、エッジ検出の際100%の黒を出してしまうと線が太く見えるということです。
逆に割合を下げれば、縮小したイラストのように線を細く見せることが出来るはずです。
●線の強弱を出す(EdgeDetection_6)
最近のイラストを観察していると結構な割合で線の太さは
深度差(特にキャラと背景)による線 > 法線差による線 >> 素材差による線
になっていることがわかると思います。
なので線の発生原因を理由として、強弱をつけていこうと思います。
SengaEffect3.cs
        material.SetTexture("_ColorTex", albedo);
        material.SetVector("_EdgePower", new Vector4(NormalEdge, DepthEdge, ColorEdge, 0)); // 追加
        material.SetTexture("_MainTex", source);
        material.SetFloat("_SampleDistance", SampleDistance);
        material.SetVector("_Threshold", new Vector4(NormalThreshold, DepthThreshold, ColorThreshold, 0));
        Graphics.Blit(source, senga, material, 0);
SengaEffect3.shader
	for (int j = 0; j < 2; j++)
	{
		half2 uv = i.uv2[j];
		half4 color = tex2D(_ColorTex, uv);
		half4 dn = tex2D(_CameraDepthNormalsTexture, uv);

		// 法線によるエッジ
		half2 ndiff = abs(centerNormal - dn.xy);
		if ((ndiff.x + ndiff.y) > _Threshold.x)
		{
			edge.a += _EdgePower.x;
		}

		// 深度によるエッジ
		half ddiff = abs(centerDepth - DecodeFloatRG(dn.zw));
		if (ddiff * _Threshold.y > 0.09 * centerDepth)
		{
			edge.a += _EdgePower.y;
		}

		// 色によるエッジ
		half3 diff = centercolor.rgb - color.rgb;
		if (dot(diff, diff) > _Threshold.z)
		{
			edge.a += _EdgePower.z;
		}
	}
	return edge;
エッジの濃さを加算することで、差が重なっているところは線が濃く(太く)見えるようになります。
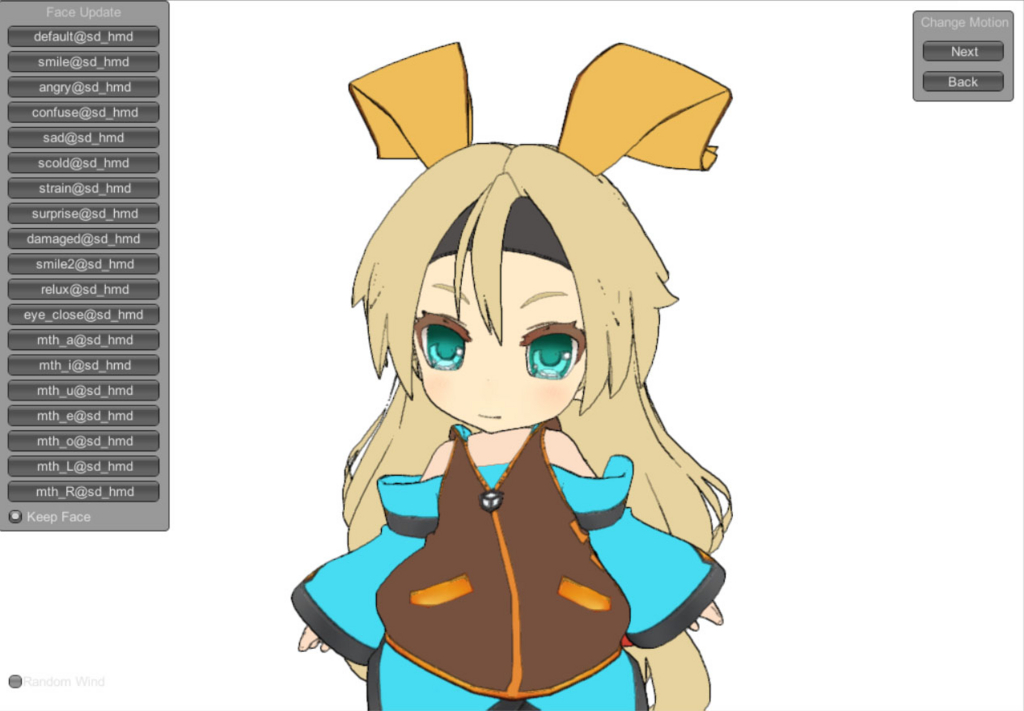
パラメータはNormalEdge0.5,DepthEdge1,ColorEdge0.3にしてあります。
またここからはAntialiasing FXAA3エフェクトもかけています
やっと半分です。

このコンテンツは、『ユニティちゃんライセンス』で提供されています
●レイヤーベースシャドウ
ここらで少し、他のトゥーン表現について考えてみます。
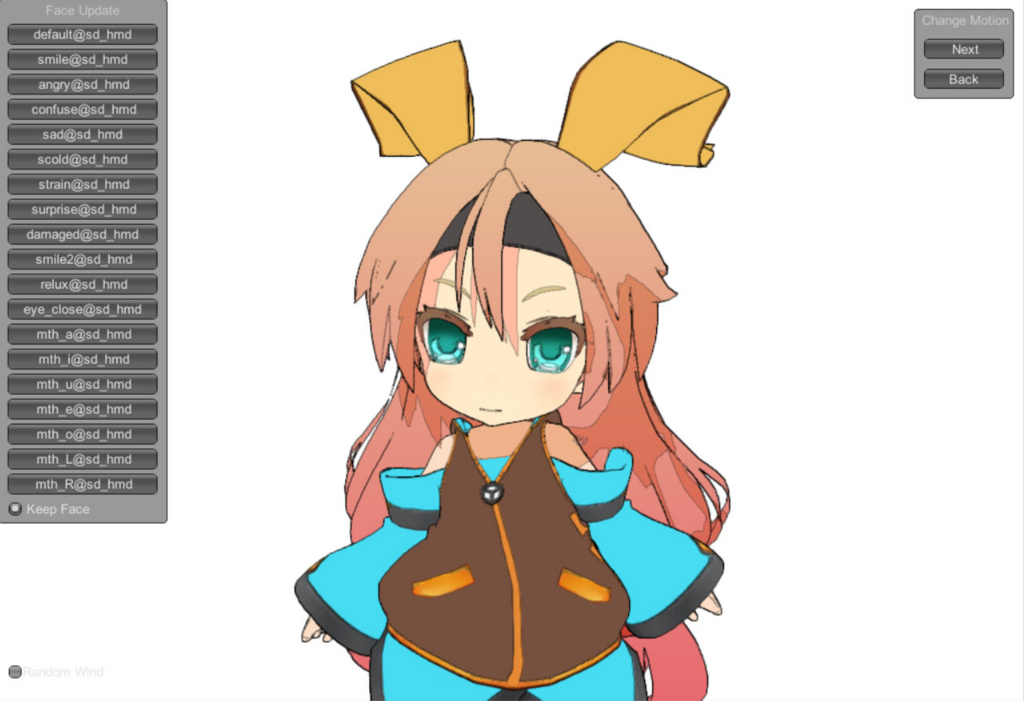
唐突ですが、髪が顔に落とす影ってありますよね。でも普通のシャドウマップを使った影だと精度は出ないし、制御も難しい。
(ScreenSpaceShadowなんてのもありますが、負荷が高いですし、トゥーン的にはあまり綺麗でもない)
それで、これまた絵を描いているとわかりますが、髪が顔に落とす影の形というのは、基本的には髪を光源と逆の方向にずらしたものと一緒になります。つまり、肌のピクセルから見て左上方向(光源方向)に髪ピクセルがあれば、その肌は影になるのです。
また、ピクセルをずらしただけだと後ろにある髪(例えば肩の後ろにある髪)から影を受け取ってしまうので、深度が手前にあるかどうかのチェックも行っています。
ついでに、髪にスクリーンスペースのグラデーションも入れています。
以下ソースコード(一部)と実行結果です。
※髪が顔に落とす影だけではなく、髪が髪に落とす影なども入っています。
また体に頭の影が落ちてほしかったので、体の色と顔の色をテクスチャ上で微妙に変えてあります。
今回は色で判定しているため、目や口が開いたりするとその部分が影を落とすピクセルとして機能しなくなり、影に穴が開く問題があります。
(実用的にはGバッファのアルベド以外にマテリアルIDなどを格納し、その値を元に判定すると良いかと思います。が、問題はどこに格納すべきかというところです。トゥーンの場合物理ベースレンダリングを無視できるので、スペキュラRGBとスムースネスの4要素は好きに使えると思ったのですが、StandardShaderはスペキュラが0じゃない場合はアルベドの値を変更してしまいます。そこを解決出来ればシャドウキャスターIDとシャドウレシーバーIDを別に割り振って好きに影を出したり消したり出来るはずです。もしくは256色限定でインデックスカラーにするという方法も考えられます。)
SengaEffect4.shader
		Pass // カラー出力(pass2)
		{
			CGPROGRAM
			#pragma vertex vert
			#pragma fragment frag
			#pragma target 5.0

			#include "UnityCG.cginc"

			struct v2f
			{
				float4 vertex : SV_POSITION;
				float2 uv : TEXCOORD0;
			};

			sampler2D _MainTex;
			uniform float4 _MainTex_TexelSize;

			sampler2D _CameraDepthNormalsTexture;
			sampler2D _CameraGBufferTexture0;

			v2f vert(appdata_img v)
			{
				v2f o;
				o.vertex = mul(UNITY_MATRIX_MVP, v.vertex);

				float2 uv = MultiplyUV(UNITY_MATRIX_TEXTURE0, v.texcoord);
				o.uv = uv;

				return o;
			}


			fixed4 frag(v2f i) : SV_Target
			{
				fixed4 layer = tex2D(_CameraGBufferTexture0, i.uv);
				fixed4 color = layer;
				float centerDepth = DecodeFloatRG(tex2D(_CameraDepthNormalsTexture, i.uv).zw);

				// 髪が落とす影
				fixed4 hair = tex2D(_CameraGBufferTexture0, i.uv + _MainTex_TexelSize * half2(-1,1) * 15);
				half4 hairD = tex2D(_CameraDepthNormalsTexture, i.uv + _MainTex_TexelSize * half2(-1, 1) * 15);
				float hairDepth = DecodeFloatRG(hairD.zw);

				float3 diff = (hair.rgb - float3(230, 211, 158) / 255.0);
				float3 diff2 = (layer.rgb - float3(255, 235, 202) / 255.0);
				if (dot(diff, diff) < 0.01 && dot(diff2, diff2) < 0.01 && hairDepth < centerDepth)
					color.rgb *= float3(1, 0.8, 0.8);

				// 髪グラデーション
				diff2 = (layer.rgb - float3(230, 211, 158) / 255.0);
				if (dot(diff2, diff2) < 0.01)
					color.rgb *= lerp(float3(1,1,1),float3(1, 0.5, 0.7),1 - i.uv.y);

				// 首影(首と頭の肌)
				hair = tex2D(_CameraGBufferTexture0, i.uv + _MainTex_TexelSize * half2(-0.5, 1) * 55);
				hairD = tex2D(_CameraDepthNormalsTexture, i.uv + _MainTex_TexelSize * half2(-0.5, 1) * 55);
				hairDepth = DecodeFloatRG(hairD.zw);
				diff = (hair.rgb - float3(255, 235, 202) / 255.0);
				diff2 = (layer.rgb - float3(253, 222, 197) / 255.0);
				if (dot(diff, diff) < 0.01 && dot(diff2, diff2) < 0.0001 && hairDepth < centerDepth)
					color.rgb *= float3(.95, 0.8, 0.7);

				// 首髪
				diff = (hair.rgb - float3(230, 211, 158) / 255.0);
				diff2 = (layer.rgb - float3(253, 222, 197) / 255.0);
				if (dot(diff, diff) < 0.01 && dot(diff2, diff2) < 0.0001 && hairDepth < centerDepth)
					color.rgb *= float3(.95, 0.8, 0.7);

				// 髪髪
				diff = (hair.rgb - float3(230, 211, 158) / 255.0);
				diff2 = (layer.rgb - float3(230, 211, 158) / 255.0);
				if (dot(diff, diff) < 0.01 && dot(diff2, diff2) < 0.01 && hairDepth + 0.0002 < centerDepth)
					color.rgb *= float3(.95, 0.8, 0.7);

				// 髪肌
				diff = (hair.rgb - float3(255, 235, 202) / 255.0);
				diff2 = (layer.rgb - float3(230, 211, 158) / 255.0);
				if (dot(diff, diff) < 0.01 && dot(diff2, diff2) < 0.0001 && hairDepth < centerDepth)
					color.rgb *= float3(.95, 0.8, 0.7);

				return color;
			}
			ENDCG
		}
●交差点を塗りつぶす(EdgeDetection_7)
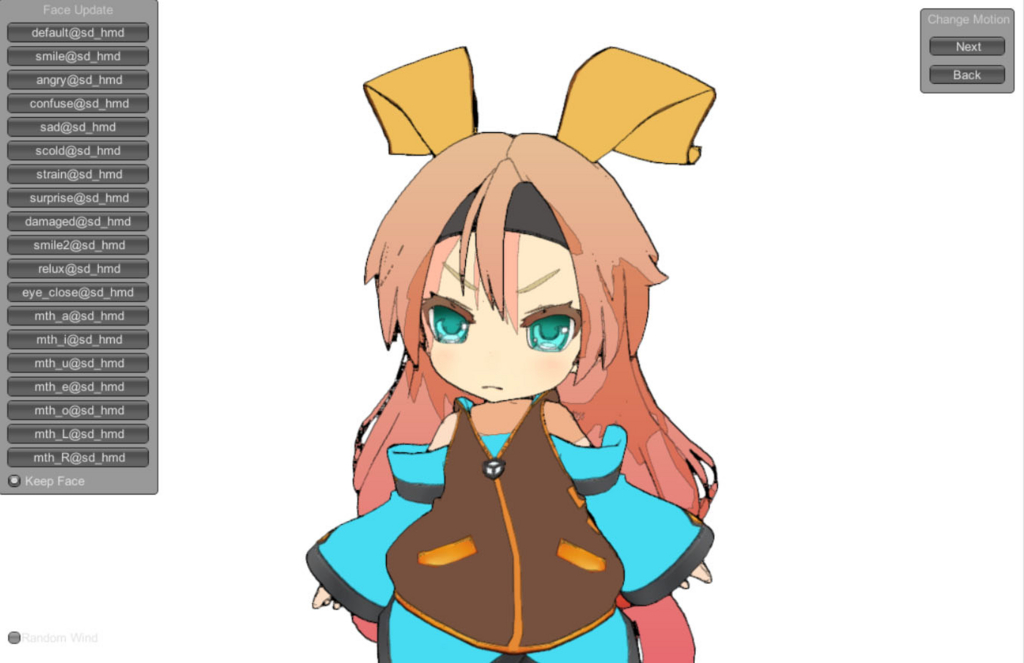
さて、線の続きです。ここからが今回やりたかったことになります。
交差点(異なる方向から来た線がぶつかった場所を太くして塗りつぶす処理)は線画にメリハリを与え迫力を与えます。
このシェーダは交差点を認識して塗りつぶすものですが、直接交差点を認識するのは難しく、仮に認識できても塗りつぶす領域を決めるのが難しいので、ある数ピクセル程度の長さを持った線分の両端がエッジピクセルだった場合、その線を塗りつぶすという単純なルールにしました。
シェーダの手順としては…
- 線分を作り両端のピクセルを調べる
- 両端がどちらもエッジピクセルなら線分を塗りつぶす(RWTexture2Dを使用)
- 線分を回転させて再び2へ
です。
RWTexture2Dを使用しているのは、通常ピクセルシェーダは自分自身のピクセル以外に色を塗ることが出来ないからです。
RWTexture2Dでは自分以外のピクセルに色を塗ることが出来ます(ただし、DirectX11以上でないと使えません)
またenableRandomWriteのテクスチャはGetTemporaryで得ることが出来なさそうなのと、SetRenderTargetなどを使う必要があるなど、いまいち使い方がまとまっていません。
以下ソースコードです。
SengaEffect5.cs
using UnityEngine;
using System.Collections;
using UnityStandardAssets.ImageEffects; // Unity5からImageEffectBaseを用いるのに必要

[ExecuteInEditMode]
public class SengaEffect5 : ImageEffectBase  // ImageEffectBaseを継承
{
    public float SampleDistance = 1;
    public float NormalThreshold = 0.1f;
    public float DepthThreshold = 5;
    public float ColorThreshold = 1f;

    public float NormalEdge = 1;
    public float DepthEdge = 1;
    public float ColorEdge = 1;

    public Texture2D Noise;
    public RenderTexture EdgeRW;

    // エフェクト有効時に、深度と法線バッファを有効にする
    void OnEnable()
    {
        GetComponent<Camera>().depthTextureMode |= DepthTextureMode.DepthNormals;
        EdgeRW = null;
    }
    protected override void OnDisable()
    {
        base.OnDisable();
        if(EdgeRW)
        {
            RenderTexture.DestroyImmediate(EdgeRW);
        }
    }

    void OnRenderImage(RenderTexture source, RenderTexture destination)
    {
        // RWTexture生成
        if (EdgeRW == null || EdgeRW.width != source.width || EdgeRW.height != source.height)
        {
            if(EdgeRW)
            {
                RenderTexture.DestroyImmediate(EdgeRW);
            }
            EdgeRW = new RenderTexture(source.width, source.height, 0, RenderTextureFormat.R8);
            EdgeRW.enableRandomWrite = true;
            EdgeRW.Create();
        }

        // 一時バッファ確保
        var senga = RenderTexture.GetTemporary(source.width, source.height, 0, RenderTextureFormat.ARGB32);
        var temp = RenderTexture.GetTemporary(source.width, source.height, 0, RenderTextureFormat.ARGB32);
        var albedo = RenderTexture.GetTemporary(source.width, source.height, 0, RenderTextureFormat.ARGB32);

        // カラー出力パス(2)
        Graphics.Blit(source, albedo, material, 2);

        // エッジ検出パス(0)
        material.SetTexture("_ColorTex", albedo);
        material.SetVector("_EdgePower", new Vector4(NormalEdge, DepthEdge, ColorEdge, 0));
        material.SetTexture("_MainTex", source);
        material.SetFloat("_SampleDistance", SampleDistance);
        material.SetVector("_Threshold", new Vector4(NormalThreshold, DepthThreshold, ColorThreshold, 0));
        Graphics.Blit(source, senga, material, 0);
        material.SetTexture("_SengaTex", senga);

        // エッジ加工パス(3)
        material.SetTexture("_Noise", Noise);
        // EdgeRWクリア
        Graphics.SetRenderTarget(EdgeRW);
        GL.Clear(false, true, new Color(0, 0, 0, 0));

        Graphics.SetRandomWriteTarget(1, EdgeRW);
        Graphics.Blit(senga, temp, material, 3);
        Graphics.ClearRandomWriteTargets(); // ここに必要らしい

        // コンポジットパス(1)
        material.SetTexture("_EdgeRW", EdgeRW);
        Graphics.Blit(source, destination, material, 1);


        // 一時バッファの解放
        RenderTexture.ReleaseTemporary(senga);
        RenderTexture.ReleaseTemporary(albedo);
        RenderTexture.ReleaseTemporary(temp);
    }
}
SengaEffect5.shader
	Pass // コンポジット(pass1)
	{
		CGPROGRAM
		#pragma vertex vert
		#pragma fragment frag
		#pragma target 5.0

		#include "UnityCG.cginc"

		struct v2f
		{
			float4 vertex : SV_POSITION;
			float2 uv : TEXCOORD0;
		};

		sampler2D _ColorTex;
		sampler2D _SengaTex;
		sampler2D _EdgeRW;

		v2f vert(appdata_img v)
		{
			v2f o;
			o.vertex = mul(UNITY_MATRIX_MVP, v.vertex);

			float2 uv = MultiplyUV(UNITY_MATRIX_TEXTURE0, v.texcoord);
			o.uv = uv;

			return o;
		}


		fixed4 frag(v2f i) : SV_Target
		{
			fixed4 color = tex2D(_ColorTex, i.uv);
			fixed4 edge = tex2D(_SengaTex, i.uv);
			edge.a = saturate(edge.a + tex2D(_EdgeRW, i.uv).r);

			return color *(1 - edge.a);
		}
		ENDCG
	}

        // pass2は同じなので省略


	Pass // エッジ加工(pass3)
	{
			CGPROGRAM
			#pragma vertex vert
			#pragma fragment frag

			#include "UnityCG.cginc"
			#pragma target 5.0

			struct v2f
			{
				float2 uv : TEXCOORD0;
				float4 vertex : SV_POSITION;
			};

			sampler2D _MainTex;
			uniform float4 _MainTex_TexelSize;
			sampler2D _Noise;
			RWTexture2D<float> _EdgeRW;

			v2f vert(appdata_img v)
			{
				v2f o;
				o.vertex = mul(UNITY_MATRIX_MVP, v.vertex);

				float2 uv = MultiplyUV(UNITY_MATRIX_TEXTURE0, v.texcoord);
				o.uv = uv;

				return o;
			}


			fixed4 frag(v2f i) : SV_Target
			{
				half PI = 3.14159265;
				half PI8 = PI / 8;


				half4 noise = tex2D(_Noise, i.uv * 25) - 0.5;
				int lineLen = 2;
				float edgeThreshold = 0.8;

				float lineRot = (noise.y + noise.x) * PI * 2;
				for (int k = 0; k < 8; k++)
				{
					float2 lineDir = float2(cos(lineRot), sin(lineRot)) * _MainTex_TexelSize.xy;
					if (tex2D(_MainTex, i.uv + lineDir * lineLen).a > edgeThreshold && tex2D(_MainTex, i.uv - lineDir * lineLen).a > edgeThreshold)
					{
						for (int j = -lineLen; j <= lineLen; j++)
						{
							int2 rwCoord;
							float2 uv = i.uv + lineDir * j;
							rwCoord.x = (int)(uv.x * _ScreenParams.x);
							rwCoord.y = (int)(uv.y * _ScreenParams.y);
							_EdgeRW[rwCoord] = 1;
						}
					}
					lineRot += PI8;
				}

				return 0;
				}
				ENDCG
		}
●ガウシアンブラー比較(明|暗)
Photoshopなどで絵の最終調整をするときのテクニックで、レイヤーをぼかしてから比較(暗)もしくは比較(明)で載せるというのがあります。
こういったレイヤーのテクニックは色々あるかと思いますので、今回は一例として作ってみました。
ガウシアンブラーはhttp://t-pot.com/program/79_Gauss/index.htmlを参考にしました。
以下ソースコードです。
BlurM.cs
using UnityEngine;
using System.Collections;
using UnityStandardAssets.ImageEffects; // Unity5からImageEffectBaseを用いるのに必要

public class BlurM : ImageEffectBase  // ImageEffectBaseを継承
{
    public float d = 5;
    public float layerOpacity = 0.5f;
    public bool dark = true;
    void OnRenderImage(RenderTexture source, RenderTexture destination)
    {
        int weightCount = 10;
        float[] weights = new float[weightCount];
        float total = 0;
        for (int i = 0; i < weightCount; i++)
        {
            weights[i] = Mathf.Exp(-0.5f * (float)(i * i) / d);

            total += weights[i];
            if (i != 0)
                total += weights[i];
        }
        for (int i = 0; i < weightCount; i++)
            weights[i] /= total;

        if(dark)
        {
            material.SetFloat("_sign", 1);
        }
        else
        {
            material.SetFloat("_sign", -1);
        }

        RenderTexture blurX = RenderTexture.GetTemporary(source.width, source.height, 0, RenderTextureFormat.ARGB32);
        RenderTexture blurY = RenderTexture.GetTemporary(source.width, source.height, 0, RenderTextureFormat.ARGB32);

        for(int i = 0;i < weightCount;i++)
        {
            material.SetFloat("weights" + i, weights[i]);
        }
        Graphics.Blit(source, blurX, material, 0);
        Graphics.Blit(blurX, blurY, material, 1);


        material.SetTexture("_MainTex", source);
        material.SetTexture("_BlurTex", blurY);
        material.SetFloat("_layeropacity", layerOpacity);
        Graphics.Blit(source, destination, material, 2);

        RenderTexture.ReleaseTemporary(blurX);
        RenderTexture.ReleaseTemporary(blurY);
    }
}
BlurM.shader
Shader "Hidden/BlurM"
{
	SubShader
	{
		// No culling or depth
		Cull Off ZWrite Off ZTest Always

		// ブラー(X)
		Pass
		{
			CGPROGRAM
			#pragma vertex vert
			#pragma fragment frag
			#pragma target 5.0

			#include "UnityCG.cginc"

			struct appdata
			{
				float4 vertex : POSITION;
				float2 uv : TEXCOORD0;
			};

			struct v2f
			{
				float4 vertex : SV_POSITION;
				float2 uv : TEXCOORD0;
			};

			sampler2D _MainTex;
			uniform float4 _MainTex_TexelSize;

			v2f vert(appdata_img v)
			{
				v2f o;
				o.vertex = mul(UNITY_MATRIX_MVP, v.vertex);

				float2 uv = MultiplyUV(UNITY_MATRIX_TEXTURE0, v.texcoord);
				o.uv = uv;
				return o;
			}

			float weights0;
			float weights1;
			float weights2;
			float weights3;
			float weights4;
			float weights5;
			float weights6;
			float weights7;
			float weights8;
			float weights9;
			fixed4 frag (v2f i) : SV_Target
			{
				float4 color = float4(tex2D(_MainTex,i.uv).rgb,1) * weights0;
				color += tex2D(_MainTex, i.uv + half2(1, 0) * _MainTex_TexelSize) * weights1;
				color += tex2D(_MainTex, i.uv + half2(-1, 0) * _MainTex_TexelSize) * weights1;
				color += tex2D(_MainTex, i.uv + half2(2, 0) * _MainTex_TexelSize) * weights2;
				color += tex2D(_MainTex, i.uv + half2(-2, 0) * _MainTex_TexelSize) * weights2;
				color += tex2D(_MainTex, i.uv + half2(3, 0) * _MainTex_TexelSize) * weights3;
				color += tex2D(_MainTex, i.uv + half2(-3, 0) * _MainTex_TexelSize) * weights3;
				color += tex2D(_MainTex, i.uv + half2(4, 0) * _MainTex_TexelSize) * weights4;
				color += tex2D(_MainTex, i.uv + half2(-4, 0) * _MainTex_TexelSize) * weights4;
				color += tex2D(_MainTex, i.uv + half2(5, 0) * _MainTex_TexelSize) * weights5;
				color += tex2D(_MainTex, i.uv + half2(-5, 0) * _MainTex_TexelSize) * weights5;
				color += tex2D(_MainTex, i.uv + half2(6, 0) * _MainTex_TexelSize) * weights6;
				color += tex2D(_MainTex, i.uv + half2(-6, 0) * _MainTex_TexelSize) * weights6;
				color += tex2D(_MainTex, i.uv + half2(7, 0) * _MainTex_TexelSize) * weights7;
				color += tex2D(_MainTex, i.uv + half2(-7, 0) * _MainTex_TexelSize) * weights7;
				color += tex2D(_MainTex, i.uv + half2(8, 0) * _MainTex_TexelSize) * weights8;
				color += tex2D(_MainTex, i.uv + half2(-8, 0) * _MainTex_TexelSize) * weights8;
				color += tex2D(_MainTex, i.uv + half2(9, 0) * _MainTex_TexelSize) * weights9;
				color += tex2D(_MainTex, i.uv + half2(-9, 0) * _MainTex_TexelSize) * weights9;
				return color;
			}
			ENDCG
		}

		// ブラー(Y)
				Pass
		{
				CGPROGRAM
				#pragma vertex vert
				#pragma fragment frag
				#pragma target 5.0

				#include "UnityCG.cginc"

			struct appdata
			{
				float4 vertex : POSITION;
				float2 uv : TEXCOORD0;
			};

			struct v2f
			{
				float4 vertex : SV_POSITION;
				float2 uv : TEXCOORD0;
			};

			sampler2D _MainTex;
			uniform float4 _MainTex_TexelSize;

			v2f vert(appdata_img v)
			{
				v2f o;
				o.vertex = mul(UNITY_MATRIX_MVP, v.vertex);

				float2 uv = MultiplyUV(UNITY_MATRIX_TEXTURE0, v.texcoord);
				o.uv = uv;
				return o;
			}


			float weights0;
			float weights1;
			float weights2;
			float weights3;
			float weights4;
			float weights5;
			float weights6;
			float weights7;
			float weights8;
			float weights9;
			fixed4 frag(v2f i) : SV_Target
			{
				return tex2D(_MainTex,i.uv);
				float4 color = float4(tex2D(_MainTex,i.uv).rgb,weights0);

				color += tex2D(_MainTex, i.uv + half2(0, 1) * _MainTex_TexelSize) * weights1;
				color += tex2D(_MainTex, i.uv + half2(0, -1) * _MainTex_TexelSize) * weights1;
				color += tex2D(_MainTex, i.uv + half2(0, 2) * _MainTex_TexelSize) * weights2;
				color += tex2D(_MainTex, i.uv + half2(0, -2) * _MainTex_TexelSize) * weights2;
				color += tex2D(_MainTex, i.uv + half2(0, 3) * _MainTex_TexelSize) * weights3;
				color += tex2D(_MainTex, i.uv + half2(0, -3) * _MainTex_TexelSize) * weights3;
				color += tex2D(_MainTex, i.uv + half2(0, 4) * _MainTex_TexelSize) * weights4;
				color += tex2D(_MainTex, i.uv + half2(0, -4) * _MainTex_TexelSize) * weights4;
				color += tex2D(_MainTex, i.uv + half2(0, 5) * _MainTex_TexelSize) * weights5;
				color += tex2D(_MainTex, i.uv + half2(0, -5) * _MainTex_TexelSize) * weights5;
				color += tex2D(_MainTex, i.uv + half2(0, 6) * _MainTex_TexelSize) * weights6;
				color += tex2D(_MainTex, i.uv + half2(0, -6) * _MainTex_TexelSize) * weights6;
				color += tex2D(_MainTex, i.uv + half2(0, 7) * _MainTex_TexelSize) * weights7;
				color += tex2D(_MainTex, i.uv + half2(0, -7) * _MainTex_TexelSize) * weights7;
				color += tex2D(_MainTex, i.uv + half2(0, 8) * _MainTex_TexelSize) * weights8;
				color += tex2D(_MainTex, i.uv + half2(0, -8) * _MainTex_TexelSize) * weights8;
				color += tex2D(_MainTex, i.uv + half2(0, 9) * _MainTex_TexelSize) * weights9;
				color += tex2D(_MainTex, i.uv + half2(0, -9) * _MainTex_TexelSize) * weights9;
				return color;
			}
				ENDCG
			}


		Pass // コンポジット(pass1)
		{
			CGPROGRAM
			#pragma vertex vert
			#pragma fragment frag
			#pragma target 5.0

			#include "UnityCG.cginc"

			struct v2f
			{
				float4 vertex : SV_POSITION;
				float2 uv : TEXCOORD0;
			};

			sampler2D _MainTex;
			sampler2D _BlurTex;
			half _layeropacity;
			half _sign;

			v2f vert(appdata_img v)
			{
				v2f o;
				o.vertex = mul(UNITY_MATRIX_MVP, v.vertex);

				float2 uv = MultiplyUV(UNITY_MATRIX_TEXTURE0, v.texcoord);
				o.uv = uv;

				return o;
			}


			fixed4 frag(v2f i) : SV_Target
			{
				fixed4 color = tex2D(_MainTex, i.uv);
				fixed4 blur = tex2D(_BlurTex, i.uv);

				if (Luminance(color.rgb) * _sign > Luminance(blur.rgb) * _sign)
				{
					color = lerp(color, blur, _layeropacity);
				}
				return color;
			}
			ENDCG
		}
	}
}
左右と上下に分離したガウシアンブラーをかけた後、Luminance関数によって明暗を判断し、レイヤーの不透明度に従ってコンポジットしています。

 また、ここからヴィネッティングとカラコレも入れていきます。
●線に色をのせる(EdgeDetection_8)
さて、再び線画の続きです。
これまではずっと黒のままだったので、線に色を入れましょう。
SengaEffect6.shaderのコンポジットパス
	fixed4 frag(v2f i) : SV_Target
	{
		fixed4 color = tex2D(_ColorTex, i.uv);
		fixed4 edge = tex2D(_SengaTex, i.uv);
		edge.a = saturate(edge.a +  tex2D(_EdgeRW, i.uv).r);

		color.rgb = lerp(color.rgb, pow(color.rgb*0.95, 1 + 5 * edge.a), edge.a);

		return color;
	}
線画の濃さの分だけ色を累乗していくことで、線に色を載せています。
0.95を掛けているのは色が累乗によって落ちやすくするためです(白の場合は何乗してもずっと白のままなので)
また、1-edge.aをreturnすると線画だけ確認することが出来ます。
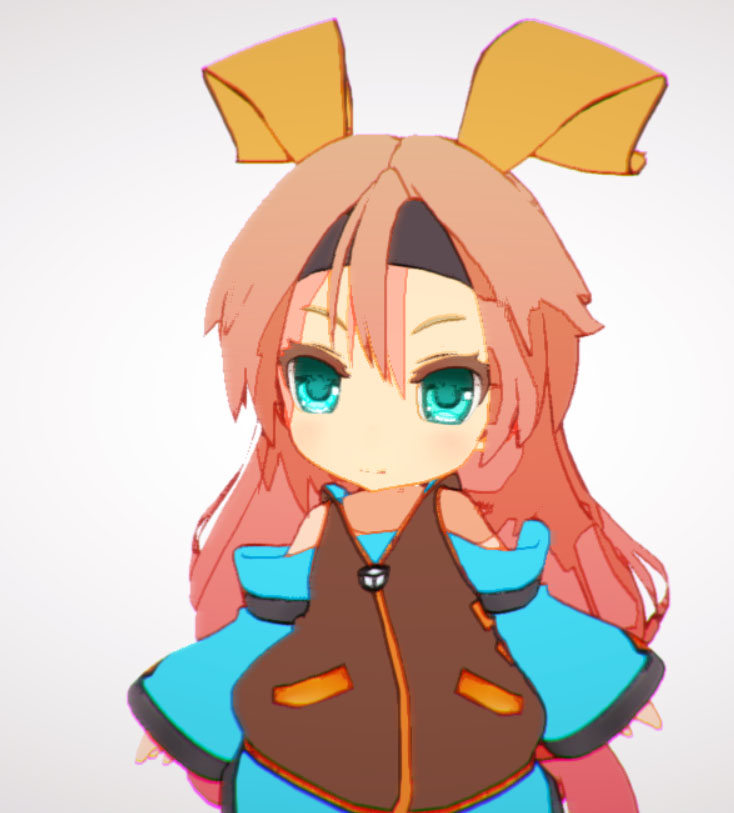
●はみ出し線(EdgeDetection_9)
最後にはみだし線を追加しましょう。最終クオリティのアニメや絵では基本存在しないものですが、手書き度合いを上げてくれます。
少し複雑ですが、交差点を追加したときの処理と流れは変わりません。
- 処理しているピクセルの周辺ピクセルのうち最もエッジの濃いピクセルを探し、どの方向を調べるかを決める。
- 探索方向のピクセルを1ピクセルずつ調べていく。
- 一定以上の個数だけエッジのピクセルが続いた場合は、そこに長い線があるものと考える。
- 同じ方向に、それより長い線を追加する。
以下のソースコードです。また_MainTex(senga)のFilterModeはPointにしておかないとダメなようです。
SengaEffect6.shaderのエッジ加工(pass3)の一部
        // 元の線画
	float4 original = tex2D(_MainTex, i.uv);

	// 探索方向を決める
	float firstRot = 0;
	float maxEdge = 0;
	for (int j = 0; j < 16; j++)
	{
		float rot = PI * 2 * j / 16;
		float x = cos(rot);
		float y = sin(rot);

		half4 e = tex2D(_MainTex, i.uv + _MainTex_TexelSize.xy * half2(x, y));
		if (e.a > 0.9 && e.a > maxEdge)
		{
			maxEdge = e.a;
			firstRot = rot;
		}
	}

	// エッジ探索
	int edgeLen = 12;
	int edgeCount = 0;
	float2 d = float2(cos(firstRot), sin(firstRot));
	for (int j = 1; j <edgeLen; j++)
	{
		float2 uv = i.uv + _MainTex_TexelSize.xy * d * j;

		half4 e = tex2D(_MainTex, uv);
		if (e.a > 0.9)
			edgeCount++;
	}

	// エッジ追加
	if (edgeCount == edgeLen-1 && original.a == 0 && maxEdge > 0.5)
	{
		int end = 35;
		float2 offset = noise.xy * d.yx *  _MainTex_TexelSize.xy * _noiseoffset ;
		for (int j = -end; j < end; j++)
		{
			int2 rwCoord;
			float2 uv = i.uv - _MainTex_TexelSize.xy * d * j + offset;
			rwCoord.x = (int)(uv.x * _ScreenParams.x);
			rwCoord.y = (int)(uv.y * _ScreenParams.y);
			_EdgeRW[rwCoord] = saturate(1 - abs(j) / (float)end);
		}
	}
閾値がパラメータ化されていませんし、最適化も全然されていませんが…
ノイズを入れて線の発生位置をずらしたりしています。
線を出力する際に角度を少しずつ変えることで曲線にすることも出来たのですが、毛が生えてるようで気持ち悪かったので直線に戻しました。
直線の認識だけでなく、曲線も認識できるようになればもっといい感じになるかと思います。
以下エッジのみ出力。
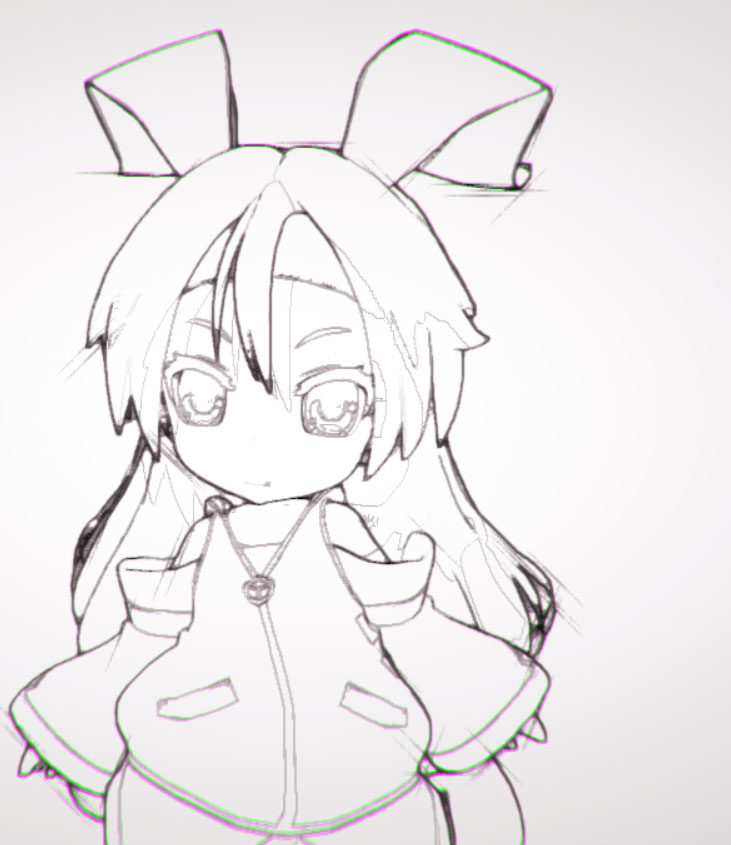
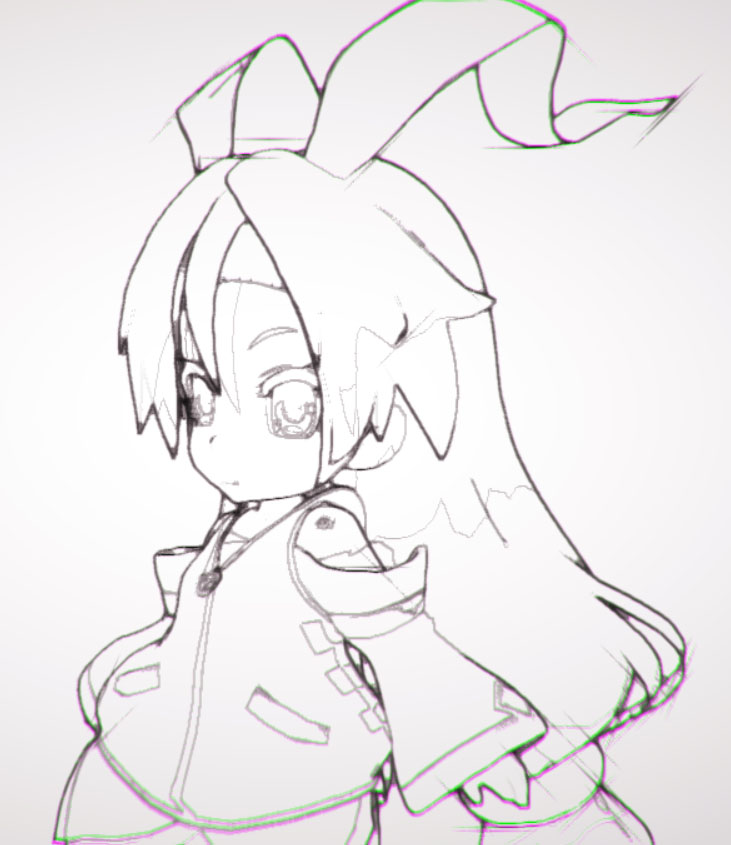
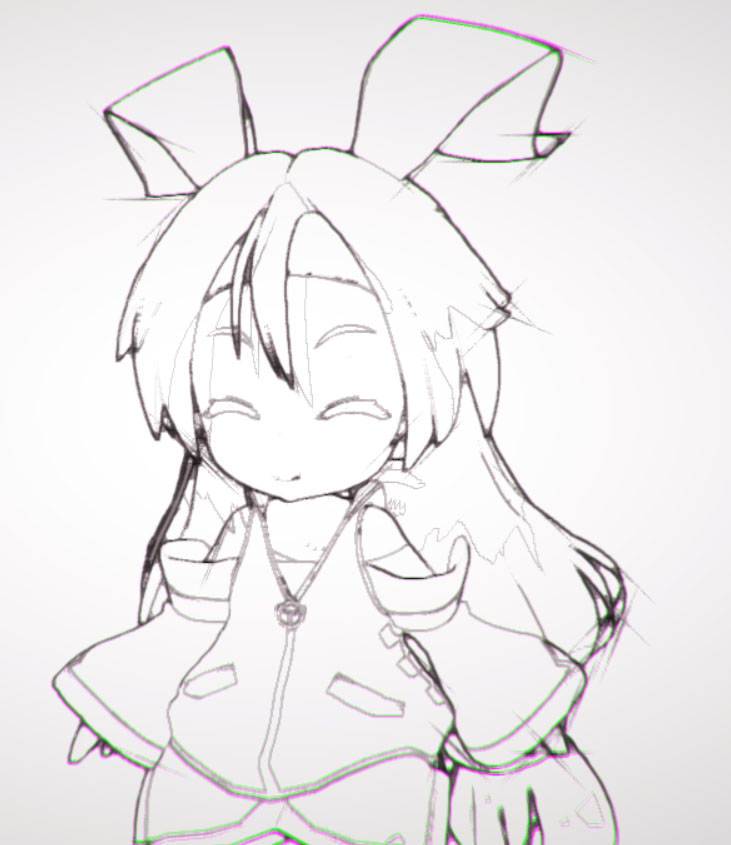
鉛筆で描いた落書きっぽくなったかと思います。
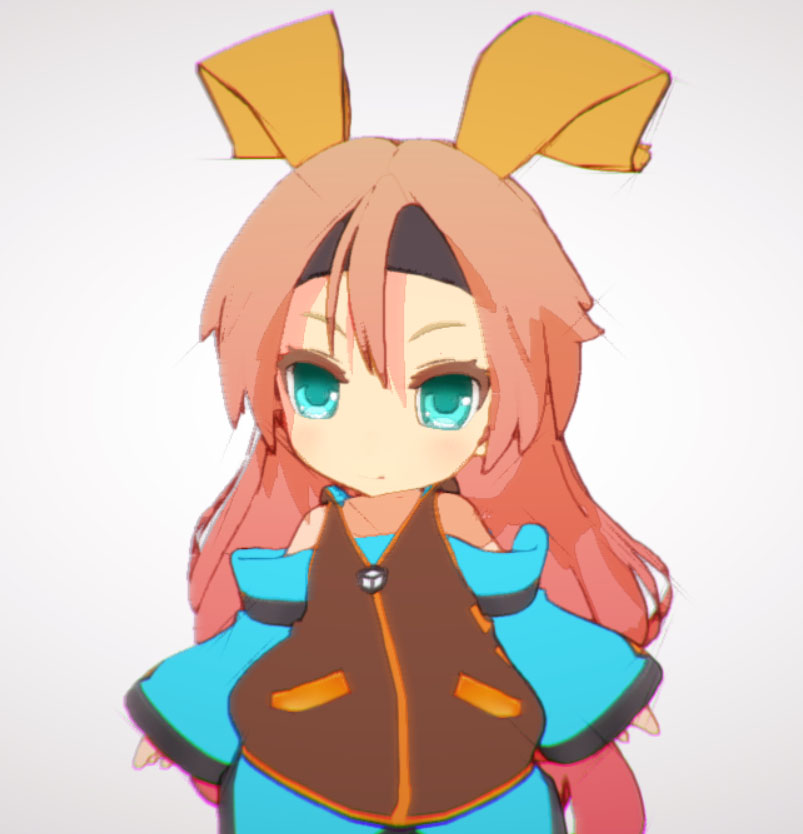
●結果
| オリジナル | トゥーン |
|---|---|
 |
 |
●まとめ
トゥーン表現に関しては現状でもGUILTY GEAR Xrd -SIGN-が最高峰だと思っていますが、個人的にはモデラーに対する負荷が高く
誰にでもマネできるものではないなぁと思っています。
なので、今回はなるべくデータを弄らず、プログラムだけでどこまでやれるか頑張ってみました。
(そういう意味での"お手軽"です。もちろんユニティちゃんのモデルが優れているから出来ることですが)
シェーダ周りは色々癖があったり思ったように色を取れなかったりと苦労はありましたが、
現状Unity5は最も簡単で、そして素早くシェーダを試すことが出来るプラットフォームです。
フォトリアル表現に関しては物理ベースレンダリングの普及によってどのエンジンも大体横並び状態になっており、シェーダを学ぶよりも絵やモデリングを学んだ方が活躍できるような気がする昨今ですが、ことトゥーンに関しては漫画やアニメイラストなど日本はまだまだ強いので、絵とシェーダ両方やる人が増えればもっと表現が増えて面白いのかなぁと思います。
市販のレンダラでアニメをレンダリングするのではなく、海外の映画みたいにインハウスでレンダラーを作るなんてのもUnity5+トゥーン表現なら比較的簡単なわけです。
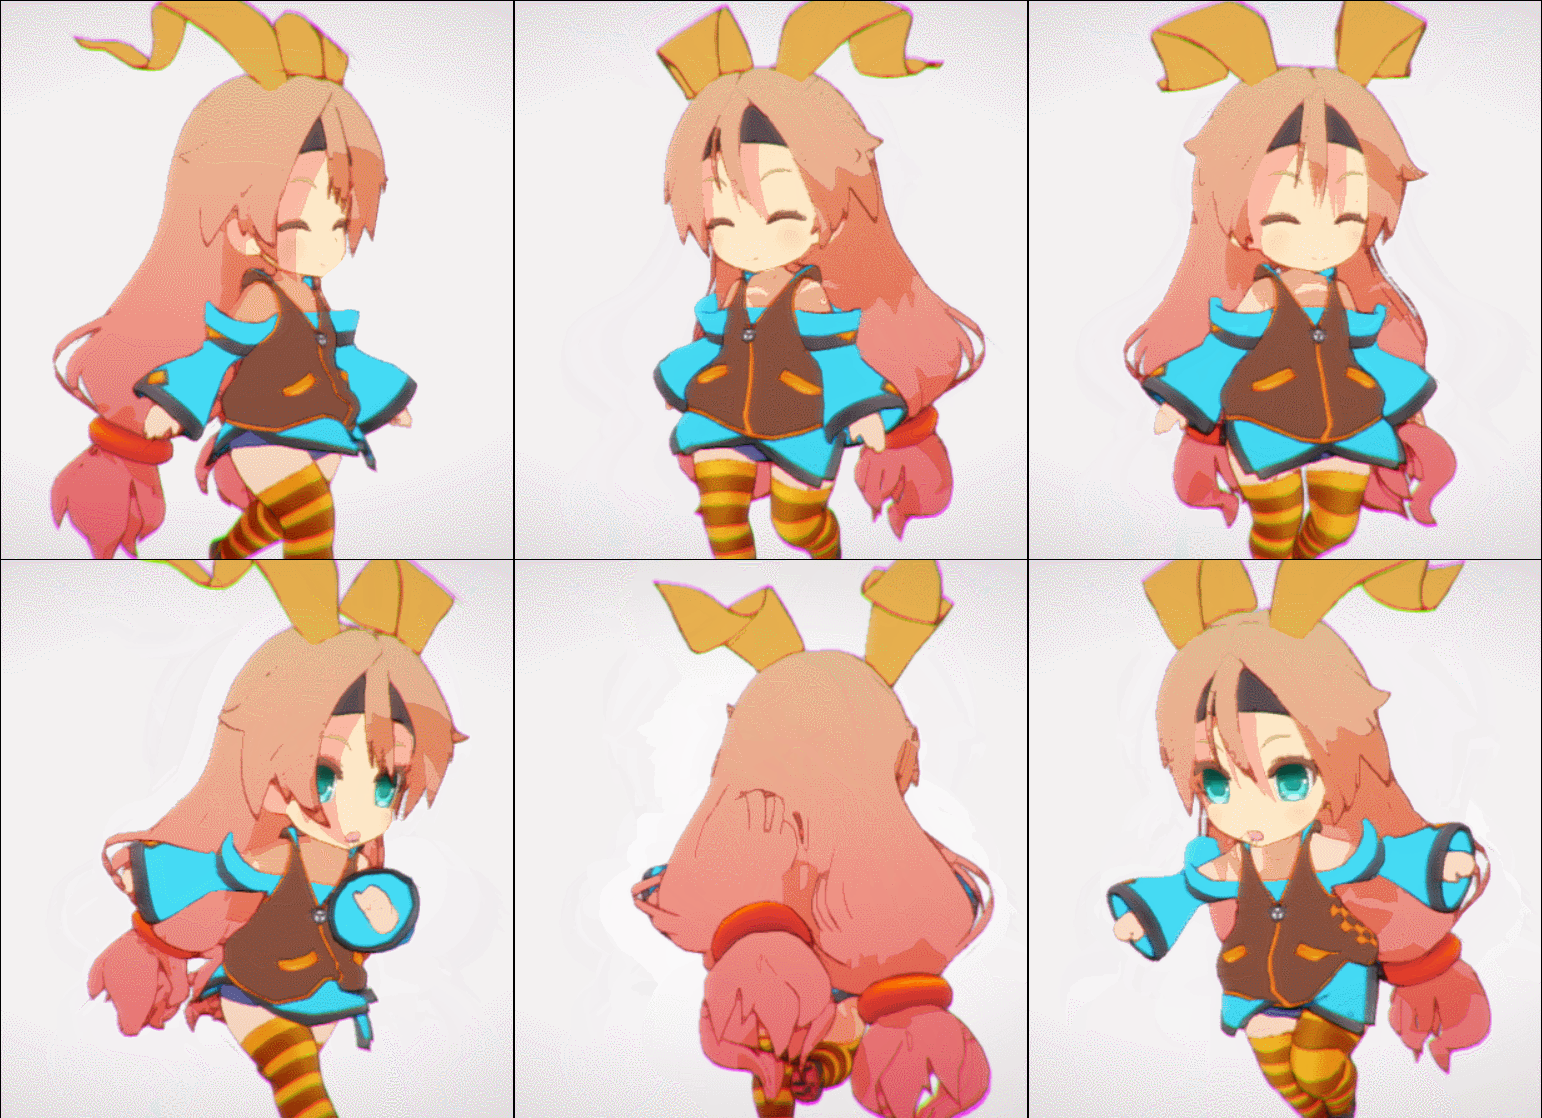
気力があれば来年あたり、コマンドバッファを使って色々実験してみたいと思います。
明日はShiroKuro - Qiitaさんの「コードなしでUIの画面遷移つくるー」です。

このコンテンツは、『ユニティちゃんライセンス』で提供されています